Dark Rift 2
This Quick Start guide is for those of you integrating Dissonance into a game with Dark Rift 2.
This tutorial will guide you through the steps required to get a basic Dissonance setup working in your project. By the end of this tutorial, you will having working voice comms with all users talking in a global chat room.
Before beginning this tutorial, please refer to the installation guide to learn how to install Dissonance into your project.
A demo scene for this tutorial can be found in the Dissonance/Integrations/DarkRift2/Demo folder. Note that to use the demo scene you must install the server plugins (see section 1a).
Step 1: Dissonance Comms Object⚓︎
Dissonance runs mostly from a single game object, which should be placed somewhere near the root of your scene. This game object contains the main "Dissonance Comms" behaviour, together with the Dark Rift networking script.
To place the default Dissonance game object into your scene, drag and drop the DissonanceSetup prefab from the Dissonance/Integrations/DarkRift2 folder into your scene. This should create a game object with two scripts attached: "Dissonance Comms" and "Dark Rift 2 Comms Network".
Step 1a: Server Setup⚓︎
Dark Rift has a system of server side plugins to process packets, Dissonance includes two plugins. For the demo scene there is a DissonanceDemoPlugin.dll, this is a very basic plugin to synchronise the positions of characters in the demo scene. There is also the DissonanceServerPlugin.dll which runs the Dissonance server logic. The precompiled plugin DLL files are included in the package, simply drop them into the plugins folder on your dark rift server. Sometimes these plugins can confuse Unity because they are not Unity plugins but Unity might try to load them anyway - if you have an error which mentions ... ambiguous between the following methods or properties then you should remove the server plugins from with the Unity project to prevent Unity from trying to load them.
If you need to modify the code of the plugins contact admin@placeholder-software.co.uk with your invoice number to request the source code.
Step 2: Add a Broadcast Trigger⚓︎
You now have a functional Dissonance comms system, but you are not yet transmitting anything.
Before you can speak to anyone, you need to add a "Voice Broadcast Trigger" script to your scene. This script can be placed anywhere, but for this tutorial, you should simply add it to the DissonanceSetup game object you created in step 1.
The "Voice Broadcast Trigger" controls when the user's microphone is being transmitted to other players, and to whom the user is talking. There are many configuration options on this script to provide more advanced control of under what situations we should be transmitting and who to, but for this tutorial simply leave the settings at default.
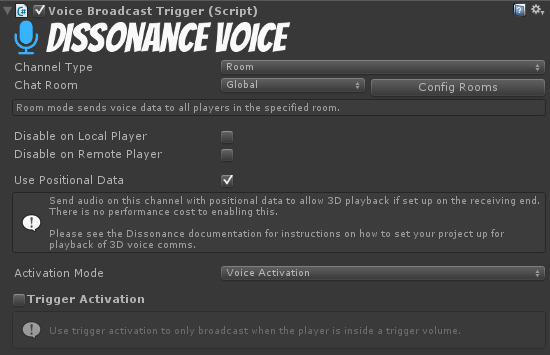
To set up the broadcast trigger, change the following two settings: 1. Transmit on Voice Activation. This means Dissonance will transmit whenever it detects that the user is speaking. 2. Transmit to the 'Global' chat room.
Step 3: Add a Receipt Trigger⚓︎
Now you are talking into the 'Global' room automatically whenever you speak. However, you still can't hear anyone speaking. This is because you are not listening to the 'Global' room and so you are not receiving any of these transmissions.
To listen to the 'Global' room, add a "Voice Receipt Trigger" to the scene. Like the "Voice Broadcast Trigger", this script can be placed anywhere, but for this tutorial you should simply add it to the DissonanceSetup game object.
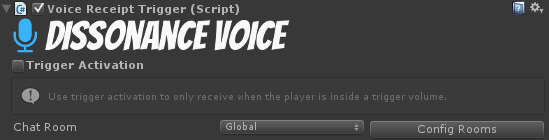
Again, leave this on the default configuration, which should have trigger activation disabled and be listening to the 'Global' chat room.
You're Done!⚓︎
Congratulations, you have now added voice comms to your game! What to do next?